martedì 9 febbraio 2016

How to Upload Photos from Adobe Lightroom to WordPress

Many photographers use Adobe Lightroom to edit photos before uploading them to WordPress. While editing photos is essential, manually uploading them to WordPress can be a time drain. In this article, we will show you how to easily upload photos from Adobe Lightroom to WordPress with just one click.


How to Upload Photos from Adobe Lightroom to WordPress


Requirements for Adobe Lightroom to WordPress Uploads


First you will need Adobe Lightroom installed in your computer. Any version after Lightroom 5 or Creative Suite would work.


Secondly, we will be using Envira Gallery, which is the best gallery plugin for WordPress. It allows you to create beautiful responsive image galleries in WordPress.


Envira Gallery recently announced the Lightroom Addon which is available with their Gold and Platinum license. This addon provides seamless integration between Adobe Lightroom and your WordPress site.


Let's take a look at how you can integrate Adobe Lightroom to WordPress.


Step 1. Setting Up Adobe Lightroom


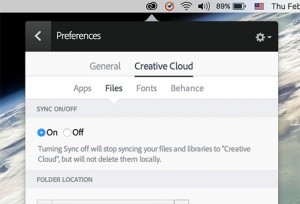
First you will need to install and setup Adobe Creative Cloud app on your computer. Upon installation, creative cloud app will ask you to sign in with your Adobe ID. Once logged in, you need to make sure that file syncing is enabled.


Enable file syncing in Adobe creative cloud app


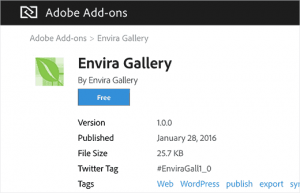
Next, you need to install the Envira Gallery addon for Adobe Lightroom. You can do this by visiting Addons for Adobe Lightroom page and searching for Envira Gallery.


Click on Envira Gallery to open the addon overview page, and then click on the Install/Free button to continue.


Installing Envira Gallery addon for Adobe Lightroom


After the installation, Adobe Creative Cloud app on your computer will show you a notification that Envira Gallery addon has been successfully installed.


The installation will also download envira-gallery.zip file to your computer. You need to go to your computer's Downloads folder to locate the file and extract it.


In your computer's downloads folder, you should now see a file enviralrplugin.zip. You need to extract this file because it contains a file named envira.lrplugin.


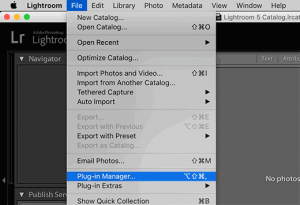
Next, you need to open Adobe Lightroom and click on File >> Plugin Manager in the toolbar.


Plugin manager menu in Adobe Lightroom


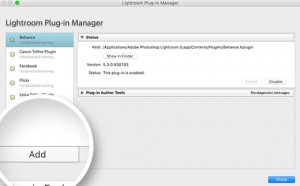
This will bring up the plugin manager window. Go ahead and click on the Add button and select the envira.lrplugin file from your computer.


Add Envira Gallery plugin in Adobe Lightroom


Click 'Done' to close the plugin manager window. You should now see Envira Gallery in Adobe Lightroom under Publish Services.


You have successfully added Envira Gallery as a publish service to Adobe Lightroom. Now we need to setup Envira Gallery to work with Lightroom.


Step 2: Setting up Envira Gallery plugin


Envira Gallery is a premium WordPress plugin. Envira's Adobe Lightroom addon comes with their Gold and Platinum plans.


First thing you will need to do is install and activate the Envira Gallery plugin. For more details, see our step by step guide on how to install a WordPress plugin.


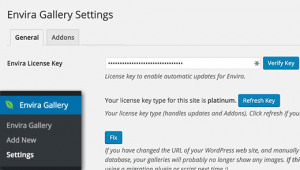
Upon activation, you need to go to Envira Gallery >> Settings page. You will need to provide your license key which can be found in your accounts page on Envira Gallery website.


Envira Gallery settings page


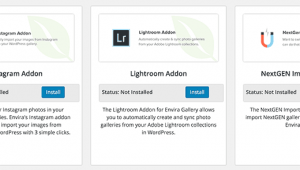
After verifying your license key, you need to click on the Addons tab and scroll down to locate the Lightroom Addon. Go ahead and click on the Install Addon button.


Envira Gallery will install the Lightroom addon, and then you need to click on the activate button to enable it.


Installing lightroom addon in Envira Gallery plugin


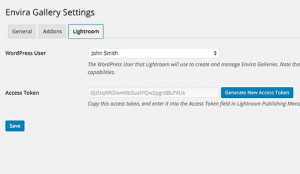
You will need to reload the settings page, and you will now see a new tab labeled Lightroom. Clicking on the Lightroom tab will show you two options.


Lightroom settings in Envira Gallery plugin


First, you need to choose the user account you want to use for publishing images from Lightroom. Second, you need to generate an access token. Copy this access token as you will need it in the next step.


Don't forget to click on the Save button to store your settings.


Step 3: Connect Lightroom to Envira Gallery on Your WordPress Site


Now that we have setup both Envira Gallery and Lightroom, the next step is to allow Lightroom to speak with Envira Gallery on your WordPress site.


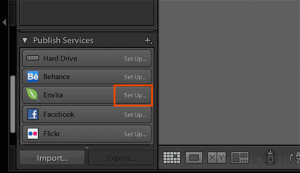
Open Adobe Lightroom and click on the 'Setup' link next to Envira Gallery under publish services panel.


Setup Envira Gallery as publish service


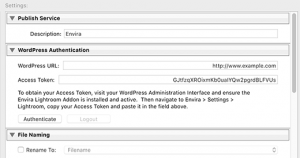
This will bring up the publishing services manager window. You will need to provide the address of your WordPress website and the access token you generated earlier.


Connecting Lightroom to Envira Gallery plugin on your WordPress site


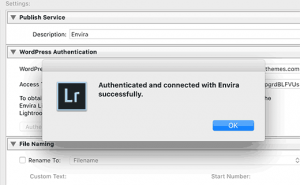
Once you do that, click on the authenticate button. Lightroom will now connect to your WordPress site, and you will see a success message when it has connected to your website successfully.


Successful authentication


Click OK button on the success message and then click on the Save button in publishing services manager window.


Step 4: Uploading Photos From Lightroom to WordPress


All the steps mentioned above were just for setting up Lightroom and Envira Gallery. You will not need to repeat those steps in the future.


Now you can easily upload photos from Adobe Lightroom to WordPress with Envira Gallery.


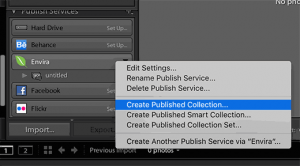
Start by going into Adobe Lightroom and then right clicking on Envira under the Publish Services panel. After that click on the 'Create Published Collection...' option from the menu.


Create new collection


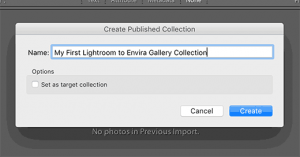
This will bring up a popup window where you need to provide a name for your collection. It is important to note that this name will also become the name of your image gallery in your WordPress site.


Collection name


Once you have chosen the name, click on the create button to continue. Lightroom will now create an empty collection for you. You can drag and drop images from your library into your new collection.


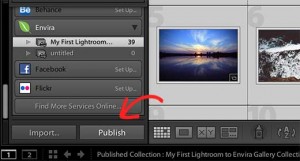
As soon as you add, remove, or edit images in a collection, you will see a Publish button appear below it. Clicking on publish button will upload your photos to WordPress and store them in your Envira Gallery.


Publish from Lightroom to Envira Gallery


You can continue editing your images in Lightroom, make changes, add or remove images, and do anything you want. You can always click on the publish button and your Envira Gallery will get updated because this addon keeps Lightroom synchronized with WordPress.


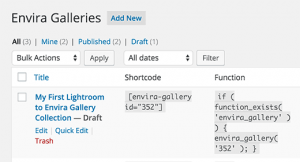
You can visit your WordPress admin area and go to Envira Gallery to see your Lightroom collection added as a gallery.


New gallery created from Lightroom


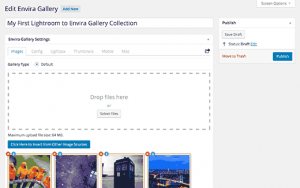
This gallery will still be stored as a draft. In order to add it into your posts or pages, you will need to publish it. Take a look at our guide on how to create image galleries with Envira Gallery


Publish Envira Gallery to add it into posts or pages


That's all. We hope this article helped you learn how to upload photos from Adobe Lightroom to WordPress. You may also want to see our guide on how to resize and make images larger without losing quality.


If you liked this article, then please subscribe to our YouTube Channel for WordPress video tutorials. You can also find us on Twitter and Facebook.


The post How to Upload Photos from Adobe Lightroom to WordPress appeared first on WPBeginner.
lunedì 25 gennaio 2016

How to Research and Locate Your Audience Using Social Media

rb-social-media-audience-560

Are you struggling to connect with your customers on social networks? Do you know where they hang out online? To optimize your social media marketing efforts, it's important to know who your customers are and which social networks they spend their time on. In this article you'll discover how to connect with your target audience [...]


This post How to Research and Locate Your Audience Using Social Media first appeared on .

- Your Guide to the Social Media Jungle

venerdì 22 gennaio 2016

Google Tag Manager: What Marketers Need to Know

ms-podcast181-christopher-penn-560

Do you use tracking codes on your website? Have you heard of Google Tag Manager? To discover what Google Tag Manager is and how to use it, I interview Christopher Penn. More About This Show The Social Media Marketing podcast is an on-demand talk radio show from Social Media Examiner. It's designed to help busy [...]


This post Google Tag Manager: What Marketers Need to Know first appeared on .

- Your Guide to the Social Media Jungle

giovedì 21 gennaio 2016

How to Add the Skype Share Button in WordPress

Did you know that Skype has a share button? We didn't either until a reader asked us for a tutorial on how to add the Skype share button in WordPress. Skype is one of the most popular communication apps in the world. In this article, we will show you how to easily add a Skype share button in WordPress.

Skype Share Button

First thing you need to do is install and activate Skype share plugin (see our beginner's guide on how to install a WordPress plugin).

Upon activation, go to Settings » Skype share button page to configure the plugin.

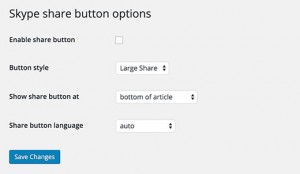
Skype share button settings page

The first option is to enable the share button. You must check this box to enable the Skype share button on your WordPress site.

Next, you need to choose a button size. Available sizes for the button are large share, small share, circle icon, and square icon.

Lastly, you need to choose the location of the button. You can either choose to show it on top of the article, below the article, or both.

Skype share can automatically detect the language of your WordPress site. But if it doesn't, then you can manually select the language.

Don't forget to click on the save changes button to store your settings.

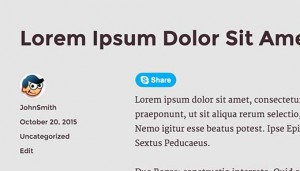
That's all, you can now visit your website to see the Skype Share button in action.

preview of Skype share button

Manually Add Skype Share in WordPress Template

If you want to manually add this in your theme files, then you can follow the manual code instructions below.

First add the following script in the head section of your file. You can either do this by directly editing your header.php file or do it the proper way of adding scripts by using Enqueue scripts.


After that add the following code in your single.php, loop.php, index.php, page.php, category.php, and archive.php as long as it is placed within the post loop.

You can change the data-style to large, small, circle, or square.

You can also change the language to your desire language.

Basically, the code above will allow the user to share the individual post with the post title as the message.

We hope this article helped you add Skype share button on your WordPress site. You may also want to see our guide on how to how to add clickable phone numbers for smartphones in WordPress

If you liked this article, then please subscribe to our YouTube Channel for WordPress video tutorials. You can also find us on Twitter and Facebook.

The post How to Add the Skype Share Button in WordPress appeared first on WPBeginner.
mercoledì 16 dicembre 2015

ustwo: An Open Source Example of a React-Powered WordPress Site

ustwo-website

If you’re looking for a real-world example of the WordPress REST API with code that you can dig into, the new ustwo.com website is open source on GitHub. ustwo is a digital product agency most well known for their work on the award-winning Monument Valley app. They partnered with Human Made, a WordPress development agency, to build the backend of the site.

The ustwo.com frontend is a React.js single-page application that serves WordPress content via the WP REST API using custom endpoints. In a post called “Open Sourcing Our Website,” ustwo developer Daniel Demmel explains why the company put the site’s frontend up on GitHub.

“Ultimately, we’ve built something that feels novel and polished enough to share publicly,” he said. “We want it to be of real use to others – after all, it’s all very well reading on a blog about how nice it is using React or Docker, with some Hello World examples, but having a chance to look under the bonnet of a production website is an entirely different thing.”

The team at ustwo decided to get innovative with a “headless WordPress” setup earlier this year, before the WP REST API was officially merged.

“The way we used WordPress as a headless setup accessible only through the API for a high profile production website was a bit of a technological bet – with WP-API landing in WordPress core six months after we decided to go for it – so sharing our experience and codebase should give execution ideas and confidence to anyone else considering this setup,” Demmel said.

Advantages of Headless WordPress

If you’re wondering why an agency might go to all the trouble of creating their website as a single-page application, you need only check out ustwo.com to see the difference. The beautiful transitions and speediness of the UI put the site head and shoulders above similar portfolio sites.

“We chose to build the site as a single-page application in order to have full control over all of its aspects – including transitions between pages – and to make navigation super fast by not having to reload the browser,” Demmel said. “We chose React.js as a main JavaScript technology to do this, since it has built-in support to render pages on the server side too (called isomorphic rendering).

“Our content management system behind this is a WordPress instance which doesn’t actually render the pages itself, but instead serves content up via the API through a mixture of standard and customised JSON REST endpoints, making the vast majority of the content editable,” he said.

Coincidentally, WordPress.com’s Calypso project runs on a similar stack. “So if you like what they’ve done to make the editor experience awesome, you’ll like what we’ve done to make the visitor experience great,” Demmel said.

ustwo opted to make their work open source just like Automattic did with Calypso, recognizing the importance of sharing in helping the whole ecosystem move forward.

“For us, there’s so much more value to be gained from building on each other’s work and knowledge than trying to hold on to a short-term technological advantage,” Demmel said.

The REST API is Changing How Teams Work Together

In a case study published on Human Made’s website, the team reviewed how working on the ustwo.com project has changed the way they work.

Working with the WordPress REST API brought a separation of concerns that meant approaching project management in a new way. Our developers were focused solely on WordPress as a data entry and delivery application. We were just one part of a wider team that included a designer, a front end React developer, a front end CSS developer, a Node.js developer, a project manager, and the stakeholder. This allowed each part of the team to be completely focused on their component, working independently while feeding back to the rest of the team.

Human Made attributes this tidy separation of concerns to the new workflow that naturally comes out of using a REST API. Back and frontend developers are no longer stepping on each other’s toes:

The technology itself facilitated this change in project management: all that the front end developers need to make the site live is to change the URL where the data is. When developers are working locally in their development environments they can work with the content from the live site; it also streamlines the process of moving from staging to production. We found that the API hasn’t just changed WordPress but changed how people work together, creating a new workflow and pushing where WordPress is going.

For more details on the ustwo.com architecture, check out Human Made’s case study as well as ustwo’s post reviewing the process. Solid open source examples like this one are always helpful when learning to build with new technologies. All the code for the website is GPL-licensed and available on GitHub for anyone to use or repurpose.

mercoledì 2 dicembre 2015

How to Post Curated Content Across Multiple Social Platforms

kh-curate-content-560

Do you manage several social media accounts? Are you having trouble keeping them all active with fresh content? Content curation plays a key role in keeping your social profiles and pages active, and your audience satisfied. In this post I’ll show you how to quickly and efficiently post curated content across all of your social […]

This post How to Post Curated Content Across Multiple Social Platforms first appeared on Social Media Examiner.
Social Media Examiner - Your Guide to the Social Media Jungle

martedì 1 dicembre 2015

8 Twitter Tips to Improve Your Twitter Marketing

ef-8-twitter-tips-560

Is your Twitter marketing working? Do you want more engagement for your tweets? Knowing how to write your tweets and when to publish them can increase visibility, boost engagement and drive traffic to your site. In this article you’ll discover eight tips to deliver better tweets. #1: Tweet Without Links Research shows that tweets without […]

This post 8 Twitter Tips to Improve Your Twitter Marketing first appeared on Social Media Examiner.
Social Media Examiner - Your Guide to the Social Media Jungle